
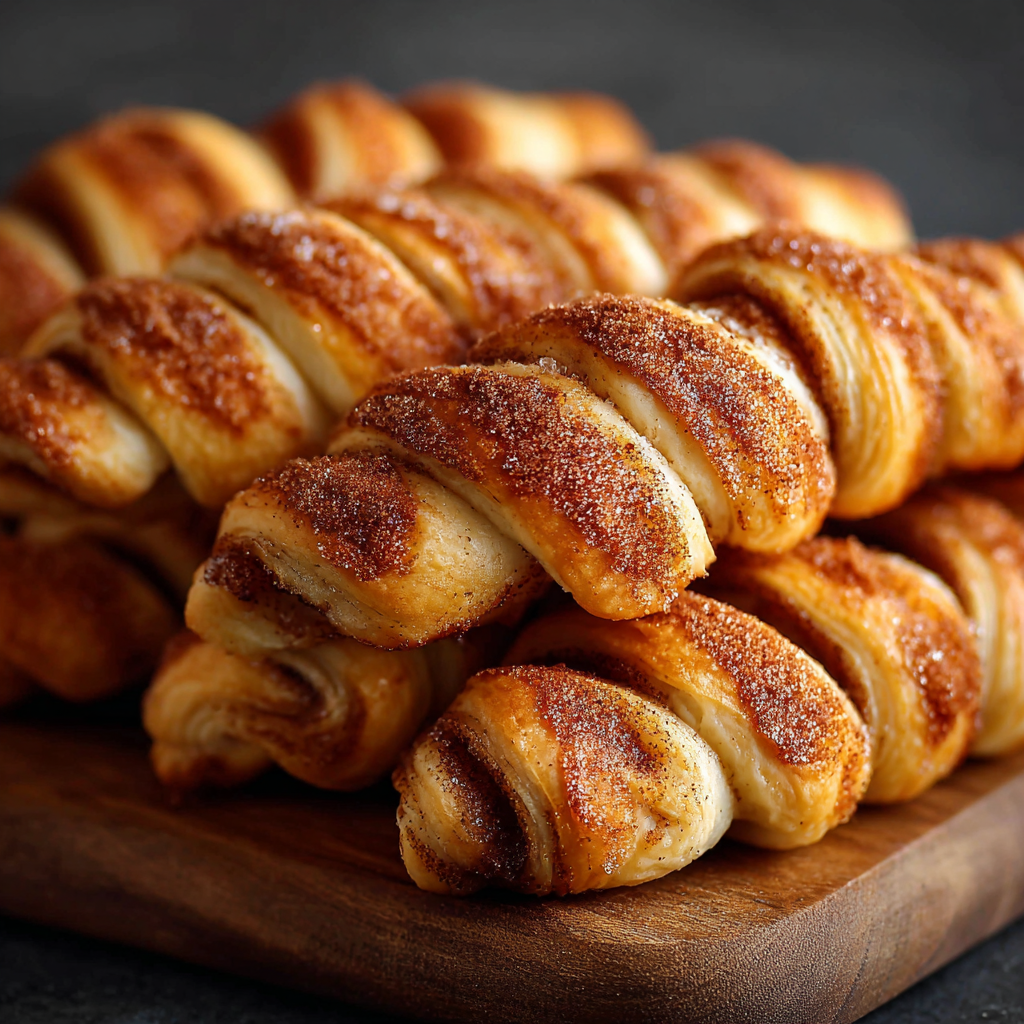
Cinnamon Crescent Twists

Quick, buttery cinnamon twists made from refrigerated crescent dough, a brown sugar filling, and a sweet glaze — perfect for breakfast, brunch, or a cozy snack.

This recipe is all about simple comfort and fast results. These Cinnamon Crescent Twists have been a favorite in my kitchen for years because they turn a humble package of refrigerated crescent dough into a warm, fragrant pastry that tastes like a bakery treat but comes together in under half an hour. I first discovered the idea on a rainy weekend when pantry staples and a need for a quick sweet fix led me to experiment with the crescent roll tube. The brown sugar and butter filling caramelizes as the dough bakes, creating delicate layers and pockets of cinnamon-scented sweetness.
What I love most is the texture contrast: a lightly crisp exterior, tender buttery layers inside, and a glossy glaze brushed on while still warm that melts into every twist. These are the kind of treats that make the kitchen smell irresistible and encourage family members to linger over breakfast. Serve them with coffee or a mug of hot chocolate and you'll have a small moment of morning magic. They are easy enough to make on a weekday yet special enough for weekend guests.
Why You'll Love This Recipe
- Ready from start to finish in about 22–24 minutes, making them ideal for busy mornings or last-minute guests.
- Uses one 8-ounce package of refrigerated crescent dough — a pantry staple that keeps the recipe reliably simple and accessible.
- Brown sugar and butter filling caramelizes during baking for a rich, layered texture without any rolling or proofing overnight.
- Make-ahead friendly: you can assemble and refrigerate the twists unbaked for a few hours, then bake when ready.
- Kid-friendly hands-on assembly; a perfect weekend activity for little helpers who can twist dough under supervision.
- The quick glaze adds just enough sweetness and shine without overpowering the cinnamon notes.
When I first served these at a casual brunch, everyone asked for the recipe. My sister commented that they tasted like a fresh pastry from a local bakery but required far less effort. Over the years I’ve learned tiny adjustments—like sealing the ends well and brushing the glaze while hot—that consistently elevate the final result.
Ingredients
- Refrigerated crescent dough (8-ounce package): Look for the full-size sheet version or a standard 8-ounce tube with perforations you can press into four rectangles; the dough provides buttery layers and quick rise when baked.
- Brown sugar (1/4 cup packed): Use light brown sugar for a classic caramel flavor; dark brown gives a deeper molasses note. Measure firmly to ensure consistent sweetness and texture.
- Butter for filling (2 tablespoons softened): Use unsalted butter softened to room temperature so it spreads easily; European-style butter adds extra richness if you want a fancier finish.
- Ground cinnamon (1 teaspoon): A warm, sweet spice that pairs perfectly with brown sugar; use fresh-ground cinnamon for the best aroma.
- Glaze — confectioners' sugar (1/4 cup): Sift if lumpy for a smooth glaze; powdered sugar dissolves quickly with a touch of hot water.
- Glaze — butter (1 tablespoon melted) and hot water (1 to 1 1/2 teaspoons): The small amount of melted butter gives the glaze richness and sheen while hot water helps the glaze reach a brushable consistency.
Instructions
Prepare the dough: Preheat the oven to 375°F (190°C). Unroll the 8-ounce package of crescent dough and separate it into four rectangles; press the seams and perforations firmly with your fingers or a rolling pin so the dough holds together while you spread the filling. Lightly grease a baking sheet or line with parchment for easy release. Make the filling: In a small bowl, combine 1/4 cup packed light brown sugar, 2 tablespoons softened unsalted butter, and 1 teaspoon ground cinnamon. Mix until paste-like and evenly combined — the butter should be soft enough to spread without tearing the dough but not melted into a puddle. Assemble the layers: Spread the cinnamon-brown sugar mixture over two of the rectangles in an even layer, leaving a tiny border to prevent overflow. Top each filled rectangle with the remaining two rectangles and press gently to seal the layers together, ensuring the filling is sandwiched between dough layers for neat twists. Cut and twist: Starting from the long side of each stacked rectangle, cut each into three even strips (I prefer a pizza cutter for clean edges). Take each strip and twist it several times along its length, then pinch or fold the ends together to keep the twist from unraveling during baking. Bake until golden: Place the twists on the prepared baking sheet spaced about 1 inch apart. Bake in the preheated 375°F oven for 12–14 minutes, or until the pieces are puffed and golden brown on top. Visual cues: edges should be deep golden, and the center should spring back slightly when touched. Glaze and finish: Immediately transfer the warm twists to a wire rack. Whisk the glaze by combining 1/4 cup confectioners' sugar, 1 tablespoon melted butter, and 1 to 1 1/2 teaspoons hot water until smooth. Brush the glaze over the warm twists so it soaks into the surface, creating a glossy finish.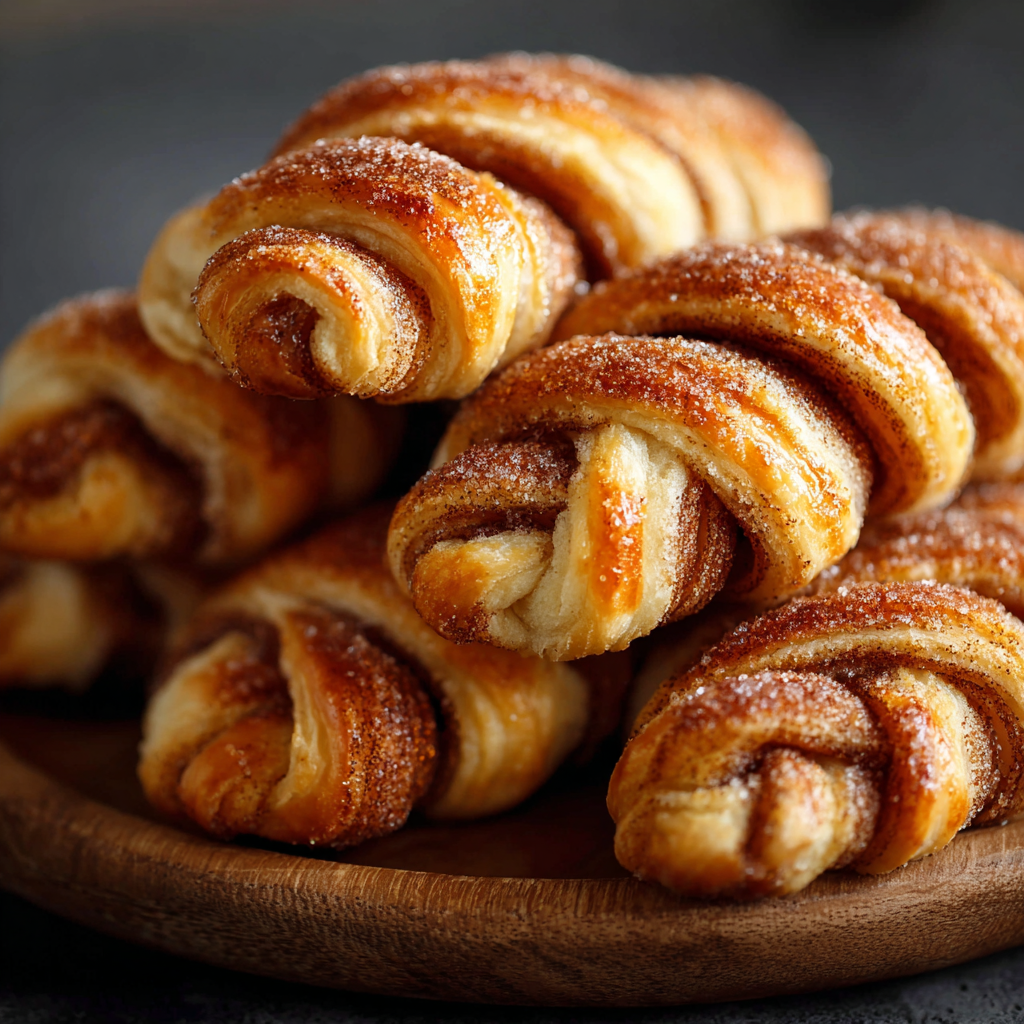
You Must Know
- The twists bake quickly — check at 12 minutes to avoid over-browning; ovens vary, so visual cues matter more than clock time.
- These keep well refrigerated for up to 3 days when stored in an airtight container; reheat briefly in a 325°F oven for best texture.
- Freezing unbaked, assembled twists for up to 1 month works well; thaw in the refrigerator overnight and bake straight from chilled (add a couple minutes to bake time).
- Because the recipe uses dairy and wheat flour in the dough and butter/glaze, it is not suitable for vegan or gluten-free diets without substitutions.
My favorite part is the aroma while they bake — that bubbling brown sugar and butter smell draws everyone into the kitchen. Once I served these alongside scrambled eggs and fresh fruit for brunch, and even folks who usually avoided pastries took one bite and asked for seconds. The simplicity is deceptive: a few deliberate steps — sealing seams, uniform strips, and glazing hot — make all the difference in the final texture.
Storage Tips
Store cooled twists in an airtight container at room temperature for up to 24 hours; beyond that, refrigerate for up to 3 days. To maintain the best texture, place a sheet of parchment between layers to prevent sticking and condensation. Reheat in a 325°F oven for 5–7 minutes or until warm; avoid microwaving for long stretches as that will make them gummy. For longer storage, freeze unbaked assembled twists on a tray until firm, then transfer to a freezer bag for up to one month. Thaw overnight in the refrigerator before baking for even results.
Ingredient Substitutions
If you need to adapt, here are reliable swaps: replace light brown sugar with coconut sugar for a slightly earthier flavor (same measure). Use vegan butter and a dairy-free crescent sheet for a dairy-free version, though texture will be slightly different. For gluten-free, look for a reliable frozen gluten-free crescent-style dough; baked color and rise may vary so watch the oven closely. Cinnamon can be blended with a pinch of nutmeg or cardamom (use 1/8 teaspoon) for a warm, holiday twist without overpowering the original flavor.
Serving Suggestions
Serve warm, brushed with the glaze, alongside a breakfast spread of scrambled eggs, fruit salad, and coffee. For a brunch, add a dollop of mascarpone or vanilla yogurt and a scatter of fresh berries. They also work as an afternoon snack with a cup of chai or black tea. For a dessert plate, serve with a scoop of vanilla ice cream and a drizzle of warmed caramel for a decadent finish. Garnish with a light dusting of cinnamon or a few toasted pecans for crunch.
Cultural Background
These twists are rooted in a tradition of quick, laminated-style pastries adapted for home cooks. Using ready-made crescent dough is an American convenience twist on European laminated pastries — it mimics layers without the labor of folding and resting dough. The cinnamon filling nods to classic spiced pastries found across many cultures, where cinnamon-sugar fillings evoke comfort and warmth. This easy adaptation is a classic of American home baking culture: quick, practical, and wildly satisfying.
Seasonal Adaptations
In fall, swap the cinnamon for a pumpkin-spice blend and fold a tablespoon of canned pumpkin into the filling for seasonal flair. Spring calls for lighter flavors: replace cinnamon with lemon zest and brush a simple lemon glaze after baking. For holiday gatherings, add a tablespoon of finely chopped pecans to the filling and finish with a maple glaze instead of the basic confectioners' sugar glaze for a festive flavor profile.
Meal Prep Tips
To streamline mornings, assemble the twists up to the cutting stage the night before and refrigerate covered; cut and twist just before baking. Alternatively, fully assemble and freeze on a tray, then store in a freezer bag; bake from chilled or thawed. Pack cooled twists in individual containers for grab-and-go breakfasts; reheat in the oven for a few minutes to restore flakiness. Use small, stackable containers to preserve shapes and avoid crushing the twists if transporting to a brunch or potluck.
These Cinnamon Crescent Twists are proof that little time and a few simple techniques can produce bakery-worthy results at home. Whether you’re feeding a crowd or treating a single cozy morning, the caramelized filling, gentle cinnamon warmth, and glossy finish turn ordinary ingredients into something memorable. Make them your own by experimenting with fillings and glazes, and enjoy the way they bring people together around the table.
Pro Tips
Press perforations firmly when sealing the crescent rectangles to prevent the filling from leaking during baking.
Use a pizza cutter for straight, even strips and consistent baking sizes so all twists finish at the same time.
Brush the glaze onto the twists while they are still warm so it soaks in for a shiny, tender finish.
If assembling ahead, refrigerate unbaked twists for up to 24 hours; allow them to come close to room temperature before baking.
This nourishing cinnamon crescent twists recipe is sure to be a staple in your kitchen. Enjoy every moist, high protein slice — it is perfect for breakfast or as a wholesome snack any time.
Tags
Cinnamon Crescent Twists
This Cinnamon Crescent Twists recipe makes perfectly juicy, tender, and flavorful steak every time! Serve with potatoes and a side salad for an unforgettable dinner in under 30 minutes.
Ingredients
Dough
Filling
Glaze
Instructions
Prepare the dough
Preheat oven to 375°F. Unroll crescent dough and press seams into four solid rectangles. Lightly grease a baking sheet or line with parchment to prevent sticking.
Mix filling
Combine 1/4 cup packed light brown sugar, 2 tablespoons softened butter, and 1 teaspoon ground cinnamon until a spreadable paste forms. Ensure butter is soft but not melted.
Assemble layers
Spread filling evenly over two rectangles, leaving a thin border. Top with the remaining two rectangles and press gently to seal the sandwich layers.
Cut and twist
Cut each stacked rectangle into three strips from the long side (six total). Twist each strip several times and pinch the ends together to keep them closed while baking.
Bake
Place twists on prepared baking sheet about 1 inch apart and bake at 375°F for 12–14 minutes, until puffed and golden brown. Check at 12 minutes to prevent over-browning.
Glaze and cool
Transfer warm twists to a wire rack. Whisk 1/4 cup confectioners' sugar with 1 tablespoon melted butter and 1–1 1/2 teaspoons hot water until smooth; brush over warm twists.
Last Step: Please leave a rating and comment letting us know how you liked this recipe! This helps our business to thrive and continue providing free, high-quality recipes for you.
Nutrition
Did You Make This?
Leave a comment & rating below or tag
@sararecipes on social media!
Categories:
You might also like...
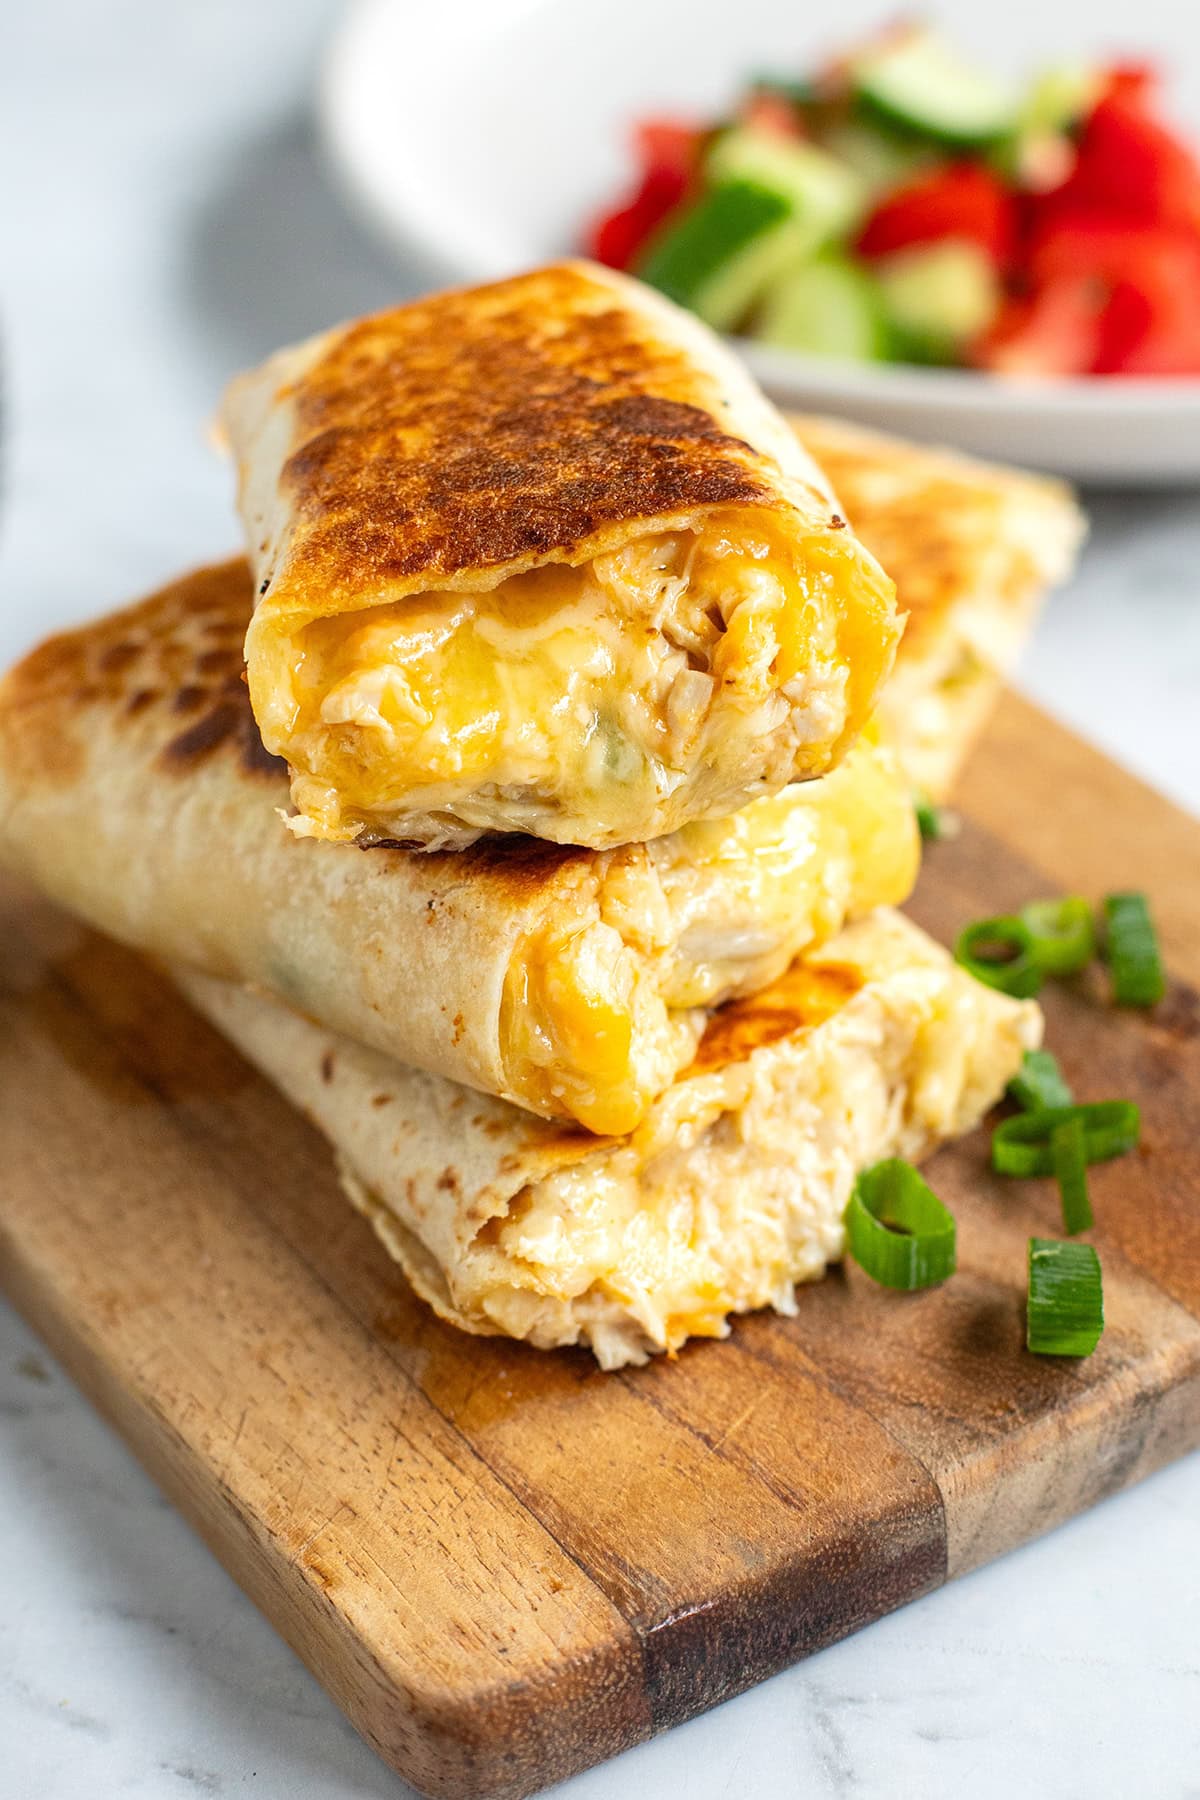
Cheesy Chicken Garlic Wraps
Golden chicken tucked into crisped tortillas with melty cheddar and mozzarella, plus a creamy garlic sauce. Weeknight-friendly and ready in 25 minutes.
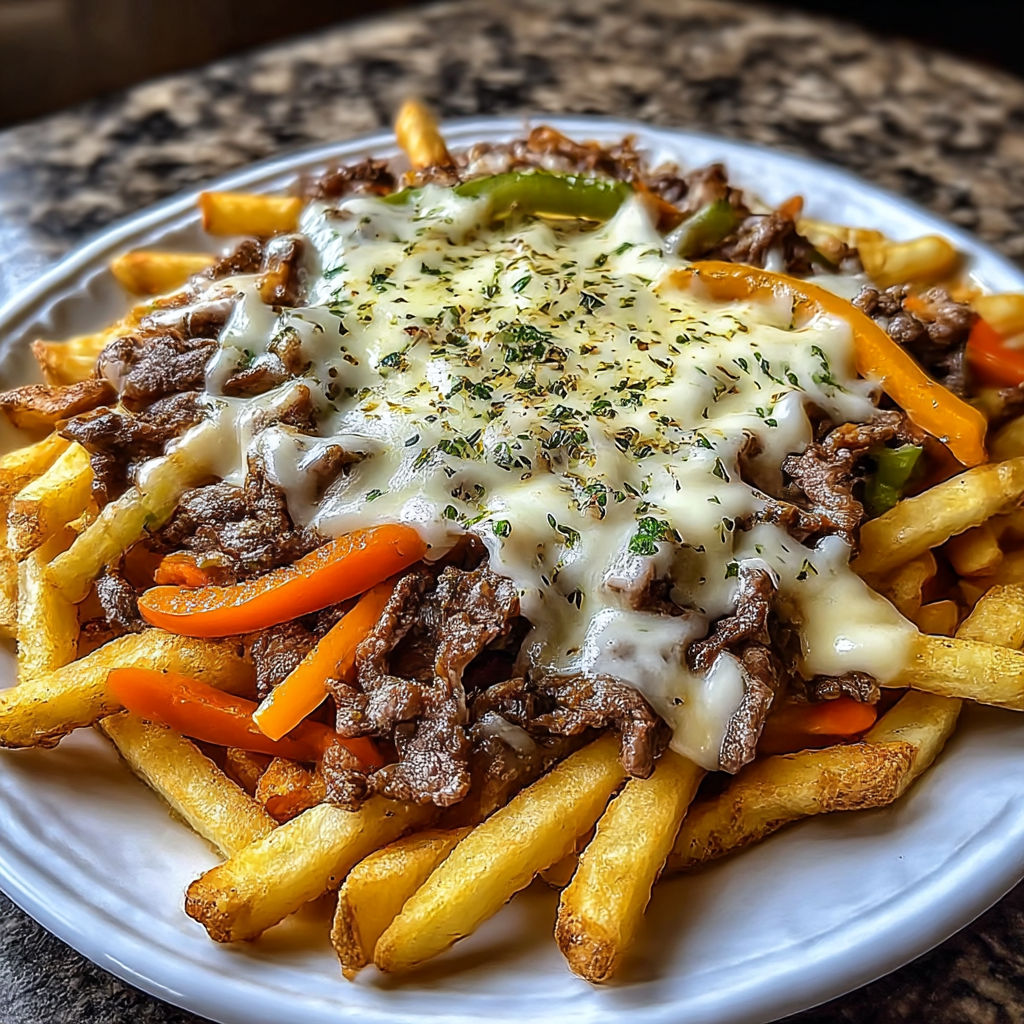
Philly Steak Cheese Fries
Crispy waffle fries piled with tender sliced steak, sautéed peppers and onions, and gooey American cheese—an indulgent, shareable skillet perfect for weeknight dinners or game-day gatherings.
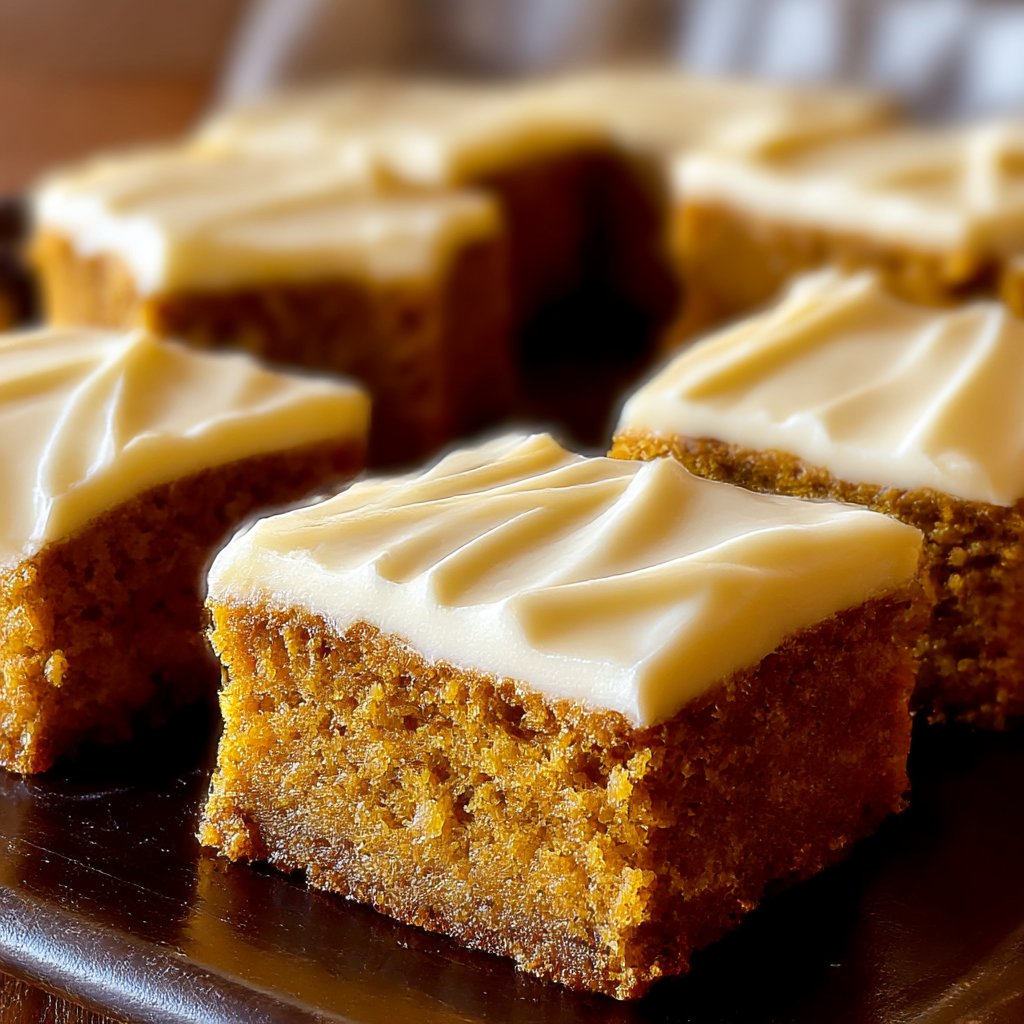
Old-Fashioned Pumpkin Bars with Cream Cheese Frosting
Tender, spiced pumpkin bars finished with a silky cream cheese frosting—perfect for fall gatherings, potlucks, and cozy afternoons.
Did You Make This?
Leave a comment & rating below or tag @sararecipes on social media!
Rate This Recipe
Share This Recipe
Enjoyed this recipe? Share it with friends and family, and don't forget to leave a review!
Comments (1)
This recipe looks amazing! Can't wait to try it.
Comments are stored locally in your browser. Server comments are displayed alongside your local comments.
Hi, I'm Sara!
What's Popular
30-Minute Meals!
Join to receive our email series which contains a round-up of some of our quick and easy family favorite recipes.