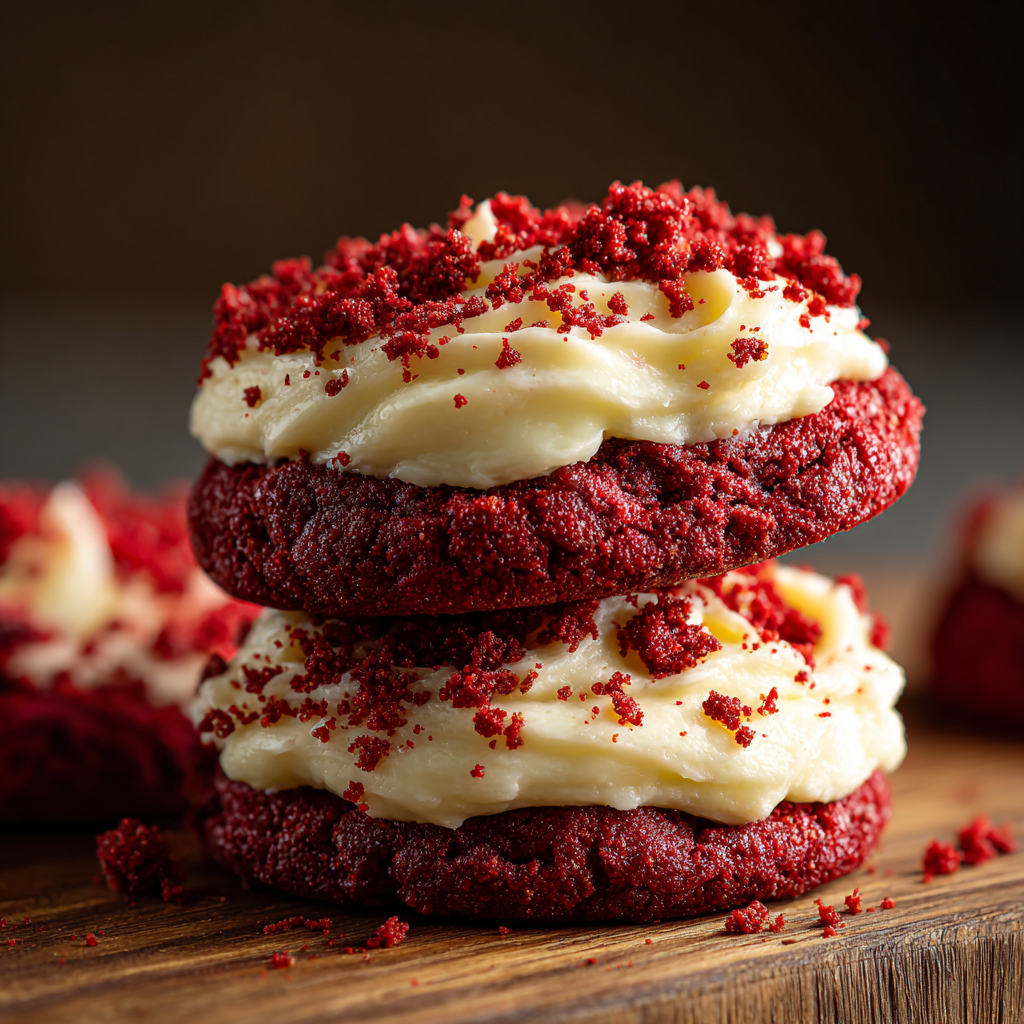
Frosted Red Velvet Cupcake Cookies

A cross between chewy cookies and tender cupcakes — domed, tender centers with a chewy edge, finished with silky cream cheese frosting and cookie crumb garnish.

This recipe is my celebration of two beloved sweets rolled into one: the tender, airy domes of a cupcake and the chewy comfort of a cookie. I first made these during a holiday baking session when I wanted something that felt special but could be eaten by hand — no plates required. The dough puffs up in the oven into little domes that have a cakey interior but still keep a soft, chewy rim, and a swirl of cream cheese frosting finishes them like tiny cupcakes. They’re bright, slightly chocolatey, and perfect for gift boxes or a festive dessert spread.
I discovered this combination through trial and error: trying to coax a cookie to behave like a cupcake without becoming a muffin. The balance comes from a small amount of cocoa, a touch of instant milk powder for tenderness, cornstarch for a tender crumb, and just enough fat to keep the edges chewy while the center rises. The result is universally loved at family gatherings — kids marvel at the color and adults appreciate the texture. These cookies are a favorite when I want something that looks party-ready but is as easy to hand out as a cookie.
Why You'll Love This Recipe
- Gives you the best of both worlds: a domed, tender interior like a cupcake with the satisfying chew of a cookie; great when you want something special but fuss-free.
- Ready in under an hour from start to finish — approximately 50 minutes total — making them ideal for last-minute celebrations or a weekend bake.
- Uses common pantry staples plus a small amount of red gel coloring; powdered or gel color works well and keeps dough consistency stable.
- Make-ahead friendly: the dough can be refrigerated for up to 24 hours and the frosting will hold up well in the fridge for a day before piping.
- Crowd-pleasing appearance: the vivid red domes with a neat cream cheese swirl make these perfect for holidays, birthdays, and bake sales.
- Easy to scale: recipe yields about nine generous cookies and can be multiplied for larger batches without changing technique.
My family’s reaction the first time I served these was instant: everyone asked how I got the cookies to look like cupcakes. Over the years I refined the timing and the scoop size to ensure consistent domes and learned the frosting firmness that prevents it from sliding. These little wins made the recipe a permanent favorite in my baking rotation.
Ingredients
- All-purpose flour (1 1/2 cups): Spoon-and-level when measuring for accuracy. I prefer King Arthur or another reliable brand for consistent texture; the flour gives structure to the domed centers without making them dense.
- Unsweetened cocoa powder (1/4 cup): Dutch-processed or natural both work; Dutch will give a deeper chocolate hue. Cocoa adds the classic faint chocolate note to red velvet and helps the color pop.
- Instant milk powder (1 tbsp): Adds tenderness and a subtle dairy richness without extra liquid. Look for nonfat instant milk powder in the baking aisle.
- Cornstarch (1 tbsp): Lightens the crumb and helps produce a tender, cakey interior by reducing gluten formation.
- Baking powder (1/2 tsp) & baking soda (1/4 tsp): Provide lift and the slight open crumb unlike a traditional flat cookie. Measure precisely for even rising.
- Salt (1/4 tsp): Balances sweetness and highlights chocolate notes.
- Unsalted butter (1/2 cup): Use room temperature butter for easier creaming. Real butter gives flavor and helps the edges brown lightly.
- Vegetable oil (3 tbsp): Keeps the cookie centers moist and tender; any neutral oil like canola or light olive will work.
- Brown sugar (1/2 cup packed) & granulated sugar (1/2 cup): A mix of sugars gives chew and depth. Dark brown will add molasses notes; light brown keeps it milder.
- Egg (1 large): At room temperature for smooth mixing and reliable emulsification.
- Vanilla extract (1 tsp) & white vinegar (1 tsp): Vinegar reacts with baking soda for lift and helps enhance the red color; vanilla rounds out flavor.
- Red liquid-gel food coloring (1–2 tsp): Gel color is preferred to avoid extra liquid; add to taste to reach the desired shade.
- Cream cheese (3 oz) & unsalted butter (6 tbsp) for the frosting: Use block cream cheese for firmness, not spreadable tub cheese. Soften both ingredients to room temperature for a lump-free, silky frosting before adding powdered sugar.
- Powdered sugar (1 1/2 cups): Sift if clumpy. Adjust the amount slightly if you want stiffer or softer piping consistency.
Instructions
Prep the oven and pans: Preheat the oven to 350°F and line two large baking sheets with parchment paper. Position racks in the center third of the oven so cookies bake evenly. Ensuring a hot oven will encourage the centers to dome. Whisk dry ingredients: In a medium bowl combine 1 1/2 cups flour, 1/4 cup cocoa, 1 tbsp instant milk powder, 1 tbsp cornstarch, 1/2 tsp baking powder, 1/4 tsp baking soda, and 1/4 tsp salt. Whisk thoroughly to break up lumps and distribute leavening evenly. Cream fats and sugars: In a large bowl whisk together 1/2 cup softened unsalted butter, 3 tbsp vegetable oil, 1/2 cup packed brown sugar, and 1/2 cup granulated sugar until smooth and homogenous. This combination of butter and oil yields both flavor and moisture. Add egg and coloring: Whisk in 1 large room-temperature egg and 1 tsp vanilla extract until combined. Stir in 1 tsp white vinegar and 1–2 tsp red gel food coloring until the mixture is very bright — the color will slightly deepen when dry ingredients are folded in. Fold in dry ingredients: Add the dry mixture to the wet and fold gently until a thick, sticky dough forms. The dough will be soft and tacky; overmixing will toughen it, so fold just until no streaks remain. Scoop and bake: Use a large 3 to 4 tablespoon cookie scoop to portion dough onto prepared sheets, spacing about 3 inches apart. Bake in the center of the oven for 12 to 15 minutes until puffed and slightly spread with very light golden edges. The tops should be domed and set. Cool before frosting: Allow cookies to cool on the sheet for 5 minutes, then transfer to a wire rack to cool completely to room temperature. Frosting warm cookies will melt the frosting and flatten the domes. Make the frosting and finish: In a medium bowl beat 3 ounces block cream cheese with 6 tbsp softened butter until smooth and lump-free. Add 1 tsp vanilla and 1 1/2 cups powdered sugar and beat until silky. Chill 30–60 minutes if too soft, then pipe or spread onto cooled cookies. Crumble any misshapen cookies and sprinkle crumbs on top for decoration.
You Must Know
- These hold well refrigerated for up to 3 days (store in an airtight container) and freeze beautifully for up to 3 months without frosting; thaw, then frost for best texture.
- Powdered sugar quantity determines frosting stiffness: add an extra 1/4 cup for firmer piping or remove 2 tablespoons for a softer spreadable consistency.
- Avoid liquid food coloring: it can add too much moisture and change the dough texture; gel or powdered color is preferred.
- The 3 to 4 tablespoon scoop size gives the cupcake-like dome; smaller scoops will flatten more and make flatter cookies.
My favorite aspect is how many guests are surprised at the texture — they expect a typical cookie and are delighted by the soft, tender middle. The little crumb garnish is a family ritual now; my niece insists on crumbling the last odd-shaped cookie and decorating the batch.
Storage Tips
Store cooled frosted cookies in a single layer or separated by parchment in an airtight container in the refrigerator for up to 3 days. For longer storage, freeze unfrosted cookies in a single layer until solid, then transfer to a freezer-safe bag for up to 3 months. Thaw overnight in the fridge before frosting, or briefly at room temperature for about 30 minutes. If you bake ahead, frost just before serving to keep the cream cheese bright and stable.
Ingredient Substitutions
For a dairy-free version, use a vegan butter and dairy-free cream cheese alternative; note texture will be slightly different and chilling time may increase. Swap granulated sugar for coconut sugar for a deeper caramel note but expect a darker color. If you lack instant milk powder, replace with 2 tablespoons heavy cream added to the wet ingredients, reducing oil by 1 teaspoon to keep balance. Use gel food coloring for best results; powdered color works but is more concentrated.
Serving Suggestions
Serve these warm at a party on a tiered stand, or boxed individually for gifts. They pair beautifully with a cup of coffee, a lightly sweetened tea, or a glass of cold milk. Garnish with a tiny sprinkle of red crumbs, a few white nonpareils for contrast, or a very light dusting of cocoa for adults. For a brunch spread, place next to fresh berries and whipped cream for a festive plate.
Cultural Background
Red velvet is an American classic with roots in Southern baking and famously associated with layered cakes and cream cheese frosting. The vibrant color became a showpiece in the early 20th century and surged in popularity through the mid-1900s with signature hotel and restaurant versions. These hybrid cookies take that tradition and translate it into a handheld treat, preserving the color, mild cocoa flavor, and cream cheese topping that define the style.
Seasonal Adaptations
For winter holidays, add a pinch of ground cinnamon or a teaspoon of instant espresso to deepen flavor; in summer, top with a fresh raspberry for brightness. For Valentine’s Day, pipe the frosting into rosettes and add white chocolate shavings. The base dough adapts well to peppermint extract (start with 1/4 teaspoon) for a holiday twist, and you can tint the frosting pale pink by adding a tiny drop of gel color.
Meal Prep Tips
To prepare for a bake sale or party, bake the cookies the day before and store unfrosted in an airtight container in the fridge. Make frosting the morning of the event and fill a piping bag so you can finish quickly. For efficient assembly-line decorating, place cookies on cooling racks over trays and pipe one consistent swirl on each; chill briefly to set before packing.
These frosted red velvet cupcake cookies are a small triumph of texture and nostalgia. Whether you bake a single batch for family or multiply the recipe for a crowd, they’re guaranteed to draw compliments and requests for the recipe. Enjoy the process, and don’t be surprised if they become a repeat request in your household too.
Pro Tips
Use a 3 to 4 tablespoon cookie scoop to achieve the characteristic domed shape.
Chill frosting if it’s too soft before piping to maintain defined swirls.
Avoid overmixing the dough after adding flour to prevent a tough texture.
Measure flour by spooning into the cup and leveling for accurate results.
This nourishing frosted red velvet cupcake cookies recipe is sure to be a staple in your kitchen. Enjoy every moist, high protein slice — it is perfect for breakfast or as a wholesome snack any time.
FAQs about Recipes
Can I freeze these cookies?
Yes — freeze unfrosted cookies in a single layer until firm, then transfer to a freezer-safe bag for up to 3 months. Thaw in the fridge before frosting.
What food coloring should I use?
Gel or powdered food coloring is recommended because liquid coloring can add unwanted moisture and change dough consistency.
Tags
Frosted Red Velvet Cupcake Cookies
This Frosted Red Velvet Cupcake Cookies recipe makes perfectly juicy, tender, and flavorful steak every time! Serve with potatoes and a side salad for an unforgettable dinner in under 30 minutes.
Ingredients
Red Velvet Cookies
Cream Cheese Frosting
Instructions
Preheat and prepare pans
Preheat oven to 350°F and line two large baking sheets with parchment paper. Place racks so cookies bake in the center third of the oven for even heat.
Combine dry ingredients
Whisk together flour, cocoa, instant milk powder, cornstarch, baking powder, baking soda, and salt in a medium bowl until evenly distributed.
Cream fats and sugars
In a large bowl whisk softened butter, vegetable oil, brown sugar, and granulated sugar until smooth and homogenous to create the base for tender cookies.
Add egg, vanilla, vinegar and color
Whisk in egg and vanilla, then add vinegar and red gel coloring until very bright. The color will deepen after dry ingredients are added.
Fold in dry ingredients
Add dry mix to wet and fold gently until a thick, sticky dough forms. Stop mixing as soon as incorporated to keep cookies tender.
Scoop and bake
Use a 3 to 4 tablespoon scoop to portion dough onto prepared sheets, spacing 3 inches apart. Bake 12–15 minutes until puffed and edges are a very light golden brown.
Cool before frosting
Cool cookies on the sheet for 5 minutes, then transfer to a wire rack to cool completely. Frosting warm cookies will melt and flatten the domes.
Make frosting and finish
Beat cream cheese and butter until lump-free, add vanilla and powdered sugar and beat until silky. Chill if necessary, then pipe or spread on cooled cookies and garnish with crumbs.
Last Step: Please leave a rating and comment letting us know how you liked this recipe! This helps our business to thrive and continue providing free, high-quality recipes for you.
Nutrition
Did You Make This?
Leave a comment & rating below or tag
@sararecipes on social media!
Categories:
You might also like...
Cheesy Chicken Garlic Wraps
Golden chicken tucked into crisped tortillas with melty cheddar and mozzarella, plus a creamy garlic sauce. Weeknight-friendly and ready in 25 minutes.
Philly Steak Cheese Fries
Crispy waffle fries piled with tender sliced steak, sautéed peppers and onions, and gooey American cheese—an indulgent, shareable skillet perfect for weeknight dinners or game-day gatherings.
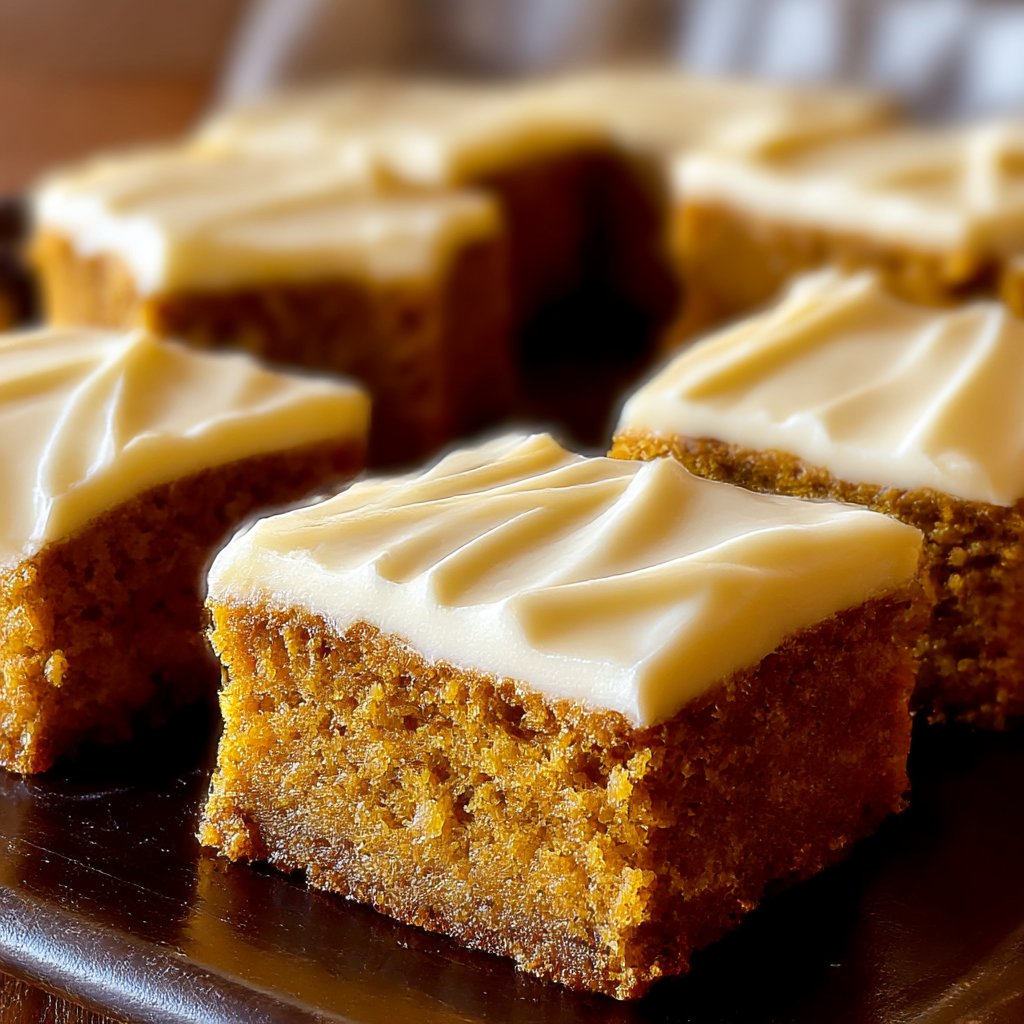
Old-Fashioned Pumpkin Bars with Cream Cheese Frosting
Tender, spiced pumpkin bars finished with a silky cream cheese frosting—perfect for fall gatherings, potlucks, and cozy afternoons.
Did You Make This?
Leave a comment & rating below or tag @sararecipes on social media!
Rate This Recipe
Share This Recipe
Enjoyed this recipe? Share it with friends and family, and don't forget to leave a review!
Comments (1)
This recipe looks amazing! Can't wait to try it.
Comments are stored locally in your browser. Server comments are displayed alongside your local comments.
Hi, I'm Sara!
What's Popular
30-Minute Meals!
Join to receive our email series which contains a round-up of some of our quick and easy family favorite recipes.